
What is the front rise measurement on a pants pattern?
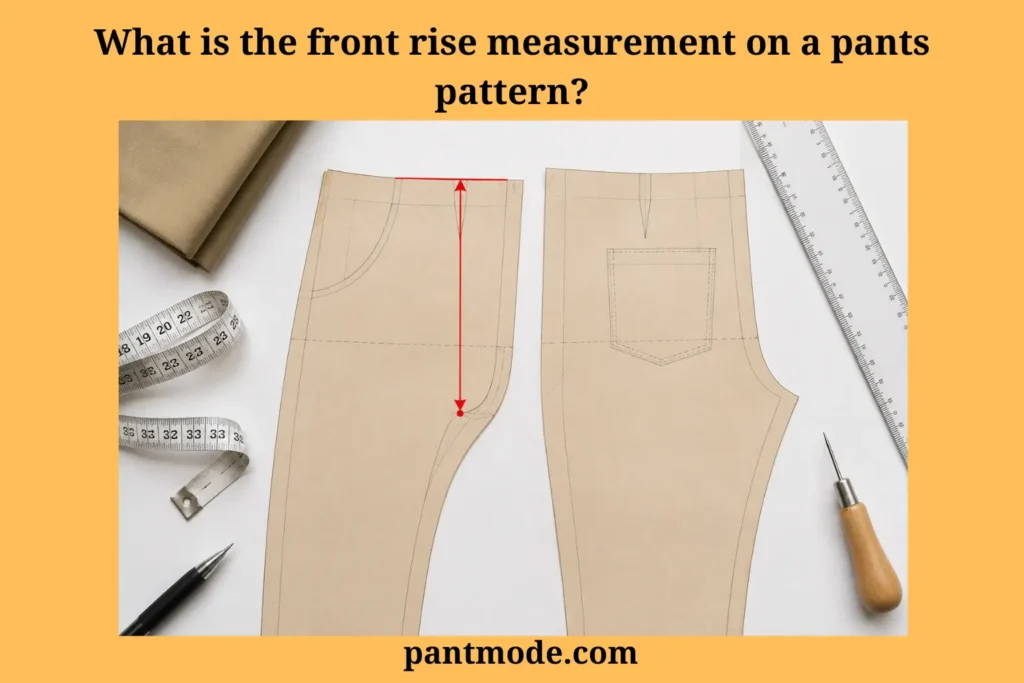
Front rise on a pants pattern is the curved front crotch stitch-line measurement from the front crotch/inseam junction to the finished waist seamline.
This article uses front rise specifically for the curved front crotch seam length measured on the stitching line. Some drafting systems use “rise” for vertical crotch depth, so the convention must be identified before measurements are compared.
The main front-rise filters are stitching line, cut edge, seam allowance, waist seamline, waistband height, crotch depth, crotch extension, back rise, inseam, body measurement, finished garment rise, muslin fitting, and pattern truing.
Quick Answer
Front rise on a pants pattern is the curved front crotch stitch-line length from the front crotch/inseam junction to the finished waist seamline. It is not the same as vertical crotch depth, crotch extension, inseam, back rise, total crotch length, or waistband height. Confirm seam allowances, mark the stitching line, walk the curve, stop at the waist seamline, and record waistband height separately.
Definition
Front rise on a pants pattern is the drafted front crotch seam length measured along the stitching line from the crotch/inseam junction to the finished waist seamline. It describes the sewn front crotch path, not merely the vertical height from waist to crotch level.
Terminology Convention
This article uses front rise to mean curved front crotch seam length on the stitching line. If another drafting system uses “rise” to mean vertical crotch depth, that system is using a different convention.
Conceptual Finished-Rise Relationship
Start with the sewn front crotch path to the waist seam, then account for the actual center-front waistband or grown-on extension used by that construction.
Boundary: do not turn this into a universal arithmetic formula. Separate, shaped, angled, contoured, grown-on, or partly lowered waistbands can change the interpretation.
Key Takeaway
Measure front rise on the stitch line, not blindly on the cut edge. Choose the rise by intended waistband placement and wearer. Alter vertical rise, crotch extension, crotch curve, abdominal length, or waistband position only after the muslin confirms the actual problem.
The working front-rise measurement follows the curved stitching line from the crotch/inseam junction to the finished waist seamline.
What Does Front Rise on a Pants Pattern Mean?
Front rise on a pants pattern means the curved front crotch seam length measured on the stitching line from the front crotch/inseam junction to the finished waist seamline.
The measurement follows the curved seam path rather than a straight vertical line. Its start is the front crotch/inseam stitching-line intersection and its end is the finished waist seamline.
Back rise is the corresponding curved back crotch seam. Total crotch length describes the broader front-to-back crotch relationship, while inseam runs from the crotch junction to the hem.
Crotch depth is the vertical waist-to-crotch-level relationship. Threads separates overall crotch length, crotch depth, and crotch width/body space in its waist-to-seat fitting discussion, supporting the need to keep those concepts distinct.
Crotch extension is used here as patternmaking terminology for horizontal crotch projection. It is not attributed as an exact Threads term unless that source explicitly uses it. Waistband height is also separate unless a finished-rise convention clearly includes it.
The related pants length factor stays separate because inseam and rise answer different measurement questions.
| Measurement | What It Measures | Typical Pattern Landmarks | Do Not Confuse With |
|---|---|---|---|
| Front rise | Curved front crotch seam length | Front crotch/inseam junction to waist seamline | Crotch depth |
| Back rise | Curved back crotch seam length | Back crotch point to back waist seamline | Front rise |
| Crotch depth | Vertical waist-to-crotch-level relationship | Waist level to crotch or seat level | Curved seam length |
| Crotch extension | Horizontal crotch projection | Leg block or hip area to crotch point | Rise height |
| Total crotch length | Front-to-back body-space relationship | Front seam plus underbody plus back seam context | Inseam |
| Inseam | Inside leg length | Crotch junction to hem | Rise |
| Waistband height | Finished band height | Waist seam to waistband top | Pattern front rise unless included |
How Does Front Rise on a Pants Pattern Differ From Body Rise and Finished Garment Rise?
Front rise on a pants pattern differs from body rise and finished garment rise because each measurement describes a different reference: the wearer, the drafted seam path, the cut edge, or the sewn garment.
A body measurement describes the wearer and intended waistband position. Depending on the drafting method, a body reference may be vertical or taken around the crotch, so it cannot automatically equal the front pattern seam length.
The pattern stitch line describes the actual sewn geometry, including the front crotch curve. The cut edge may differ when seam allowance is included. Finished garment rise then adds the effects of sewing, waist position, waistband construction, fabric behavior, and pressing.
Body dimensions can help identify a starting pants size, but final front-rise fit still depends on geometry, body space, fabric, and muslin behavior. No universal rise-ease increment applies to every pattern.
| Measurement Source | What You Measure | Use |
|---|---|---|
| Wearer / body | Intended waist position and body dimensions | Establish fit goal |
| Pattern cut edge | Outer paper edge | Cutting reference |
| Pattern stitch line | Actual sewn seam path | Best comparison for pattern seam length |
| Finished garment | Sewn crotch to finished waist or top edge | Verify actual fit |
| Waistband piece | Finished band height and placement | Determine final waist placement |
| Muslin | Real movement, draglines, and seam pressure | Diagnose geometry |
Conceptual Finished-Rise Relationship
Start with the sewn front crotch path to the waist seam, then account for the actual center-front waistband or grown-on extension used by that construction. Do not apply a universal seam-allowance subtraction or waistband-addition formula without identifying the construction.
How Do You Measure Front Rise on a Pants Pattern Correctly?
You measure front rise on a pants pattern correctly by confirming the seam-allowance convention, marking the stitching line, and walking the curved front crotch seam from the inseam junction to the finished waist seamline.
Step 1: confirm whether seam allowances are included. Commercial, self-drafted, industry, and block patterns do not all follow the same convention.
Step 2: mark the front crotch stitching line, waist seamline, and crotch/inseam junction where necessary.
Step 3: begin at the stitching-line intersection where the front crotch curve meets the inseam.
Step 4: walk the curved seam with a flexible tape, flexible curve, or measuring wheel. Threads’ self-fitting pants guide supports measuring front and back crotch curves along the pattern seamlines and also supports muslin and truing workflow.
Step 5: stop at the finished waist seamline rather than automatically measuring to the cut edge.
Step 6: record waistband height, shape, angle, and placement separately where relevant.
Step 7: compare only measurements taken with the same endpoints and convention.
| Step | Action | Main Error Prevented |
|---|---|---|
| 1 | Confirm seam allowance convention | Cut-line vs stitch-line confusion |
| 2 | Mark seamlines | Inaccurate endpoints |
| 3 | Locate crotch/inseam junction | Wrong starting point |
| 4 | Walk curved seam | Straight-line under-measurement |
| 5 | Stop at waist seamline | Accidental seam allowance inclusion |
| 6 | Record waistband separately | Finished-height confusion |
| 7 | Compare using same convention | Apples-to-oranges comparison |
How Do You Choose Front Rise on a Pants Pattern for Low-, Mid-, and High-Rise Pants?
You choose front rise on a pants pattern for low-, mid-, and high-rise pants by drafting the finished waistband position around the wearer and then fitting the crotch geometry to that design.
Low rise places the finished waist below the natural waist. The lower waist position must still preserve adequate crotch length, hip shaping, sitting comfort, and waistband stability.
Mid rise occupies an intermediate torso position according to the block and design. Establish the intended waist seam first and then fit the crotch geometry to the wearer.
High rise sits near or above the natural waist depending on design. It may require additional upper-pattern height rather than simply extending the crotch point.
Contoured high-rise and curved low-rise bands add construction variables such as darts, contour, front/back balance, gaping, rolling, and pulling.
Low-, mid-, and high-rise are design placements, not universal inch ranges. The wearer’s intended waistband position and pant style define the target.
| Rise Style | Waist Placement | Main Pattern Variable | Primary Fit Check |
|---|---|---|---|
| Low rise | Below natural waist | Waistline level and upper rise | Stability |
| Mid rise | Intermediate torso position | Waistline and crotch relationship | Sitting comfort |
| High rise | Near or above natural waist | Upper rise length and shaping | Torso fit |
| Contoured high rise | Follows waist shape closely | Waist darts and contouring | Gaping |
| Low rise with curved band | Below waist with shaped waistband | Band geometry and front/back balance | Rolling or pulling |
Vertical rise, horizontal body space, curve depth, abdominal length, and waist placement are separate correction paths.
Which Alteration Should You Use for Front Rise on a Pants Pattern Based on the Actual Fit Problem?
The alteration you use for front rise on a pants pattern should match the actual fit problem because vertical rise, crotch extension, front curve depth, abdominal length, and waistband position solve different issues.
More vertical height: use a controlled horizontal lengthen/shorten line above the crotch level. Do not use this as an automatic cure for insufficient horizontal body space.
Less vertical height: overlap at the appropriate adjustment line. Do not remove upper height when the front curve itself is the problem.
More horizontal crotch space: test the crotch-point or extension region according to the pattern system. Horizontal body space is not the same as waist height.
More front body depth: test a very small front-curve change only after the muslin confirms that direction.
More abdominal length: add upper center-front length and blend appropriately. This targets front-waist pulling rather than every crotch symptom.
Waist placement only: redraft the waist seam and waistband without automatically changing the crotch curve. Use the broader pants fit context to separate intended silhouette from an actual pattern mismatch.
| Fit Need | Primary Alteration | Main Area Changed |
|---|---|---|
| More vertical rise | Slash and spread above crotch | Upper front |
| Less vertical rise | Slash and overlap | Upper front |
| More crotch extension | Add near front crotch point | Horizontal crotch area |
| More pubic/body depth | Small curve scoop if confirmed | Front crotch curve |
| More abdominal length | Add center-front length | Upper center front |
| Raise or lower style waist | Redraft waistline | Waist only |
How Do You Lengthen or Shorten Front Rise on a Pants Pattern Without Distorting It?
You lengthen or shorten front rise on a pants pattern without distorting it by adjusting through a controlled line, preserving grainline balance, and truing every affected seam afterward.
To add vertical front rise, mark a horizontal adjustment line above the crotch curve and below major waist shaping where practical. Spread only the amount supported by fitting evidence, preserve grainline alignment, then redraw center front and side seam smoothly.
To remove vertical rise, overlap at the corresponding line by the tested amount. Recheck darts, pleats, pocket openings, fly placement, and waistband compatibility.
If only waist placement changes, raise or lower the waist seam and redraft the waistband without automatically changing the crotch curve.
If crotch extension changes, work near the crotch point and recheck the inseam entry angle, curve smoothness, and sewing length.
Threads source 2 includes numeric examples and a method that can split a stride change between front and back. Those examples are method-specific and are not universal front/back drafting rules.
| Adjustment | Method | Must Recheck |
|---|---|---|
| Add vertical rise | Horizontal spread | Center front, side seam, darts |
| Remove vertical rise | Horizontal overlap | Center front, side seam, pockets |
| Raise waist only | Redraw waistline | Waistband |
| Lower waist only | Redraw waistline | Band and pocket relationship |
| Add crotch extension | Alter crotch point | Inseam and curve |
| Scoop front curve | Tiny curve change | Seam length and muslin fit |
How Do You Diagnose Front Rise on a Pants Pattern Through Muslin Fit Problems?
You diagnose front rise on a pants pattern through muslin fit problems by reading dragline direction, seam pressure, waistband movement, excess fabric, and seated behavior before changing the draft.
Dragline shape is a clue, not proof. The muslin should help determine whether the issue is too much fabric, too little fabric, horizontal body space, curve depth, abdominal length, or waistband position.
Upward or smile-shaped draglines may suggest insufficient front crotch length or body space. Temporarily release the strain area or add test length before deciding on the permanent correction.
Downward or frown-shaped draglines may suggest excess crotch length. Pin out small amounts and observe whether the lines relax before removing length from the pattern.
Vertical seam digging may indicate insufficient front body depth. A tiny scoop test can help diagnosis, but curve changes should remain small and reversible during testing.
Front-waist pulling downward can indicate insufficient upper center-front or abdominal length. Excess front-waist folds can indicate too much front length or unsuitable waist shaping.
Seated-only tightness matters because dynamic body space can differ from standing behavior. Sit, walk, and bend in the muslin. If the fashion fabric differs from the test fabric, the pants fabric also matters because stretch, drape, and recovery can alter the result.
| Fit Defect | Possible Cause | First Diagnostic Test | Likely Adjustment |
|---|---|---|---|
| Upward / smile draglines | Too little crotch length or body space may be present | Add temporary length or release strain area | Add length or extension only if confirmed |
| Downward / frown draglines | Excess crotch length may be present | Pin out excess in small amounts | Shorten only the confirmed excess |
| Vertical seam digging | Insufficient front body depth may be present | Tiny scoop test | Adjust front curve in small increments |
| Front waistband pulled down | Insufficient front or abdomen length may be present | Release or add front length temporarily | Add upper center-front length if confirmed |
| Excess front-waist folds | Too much front length or wrong waist shaping may be present | Pin excess and observe change | Remove confirmed amount |
| Tight only when seated | Dynamic body space may be insufficient | Sit and movement test | Assess rise plus extension together |
How Should You Walk, True, and Recheck Front Rise on a Pants Pattern After Alteration?
You should walk, true, and recheck front rise on a pants pattern after alteration to confirm that the crotch curve, inseam, waist, fly, pockets, waistband, grainline, and balance lines still sew correctly.
Walk the altered seam relationships to confirm continuity and sewability. Do not assume front and back crotch seams must be numerically equal because they serve different body shapes.
Walk the front and back inseams from the crotch downward. Some patterns intentionally include ease or shaping, so verify design intent rather than forcing exact equality.
True the center-front/waist junction so it is smooth and sewable. Fly, fold, waistband, seam allowance, and closure construction determine the appropriate junction; do not impose an arbitrary 90-degree rule.
Recheck fly extension, pocket opening, dart or pleat placement, waistband seam length, grainline, and balance lines after the alteration.
| Check | What to Verify | Common Failure |
|---|---|---|
| Front crotch curve | Smooth sewn curve | Kink |
| Inseam | Intended front/back relationship | Forced equality |
| Center front and waist | Smooth sewable junction | Point or dip |
| Fly | Closure still aligns | Fly too short or too long |
| Opening still functional | Pocket distorted | |
| Waistband | Seam length matches | Band mismatch |
| Grainline | Remains intentional | Leg twist |
| Balance lines | Still aligned | Pattern distortion |
Approve the pattern only when terminology, measurement, diagnosis, alteration, truing, and re-testing agree.
What F50 Checks Verify Front Rise on a Pants Pattern Before Cutting Fabric?
F50 checks verify front rise on a pants pattern before cutting fabric by turning terminology, stitch-line measurement, waist placement, muslin diagnosis, alteration type, truing, and construction checks into a controlled decision path.
Trigger: define whether the task is measuring, altering, diagnosing, truing, or approving front rise.
Classification: identify terminology, seam allowance, start point, end point, waistband construction, waist placement, symptom, and likely cause before altering.
Recommendation: match the diagnosis to vertical rise, crotch extension, curve depth, abdominal length, waistline redraft, or another muslin.
Red flag: stop for cut-edge confusion, crotch-depth confusion, automatic waistband inclusion, universal benchmarks, unsupported source attribution, undiagnosed scooping, smile/frown confusion, dragline overconfidence, inherited numeric examples, or ignored construction pieces.
Exception: allow different drafting terminology, waistband-inclusive finished-rise definitions, intentional seam differences, construction-specific corners, and tiny curve changes only when clearly stated and verified.
Verification: approve only after measurement, muslin, seam walking, truing, fly, pocket, waistband, grainline, balance, and pre-cut checks pass.
| F50 Step | Control Question | Pass Standard |
|---|---|---|
| Trigger | Is the reader defining, measuring, altering, diagnosing, truing, or approving front rise? | Decision situation is clear |
| Classification | What terminology, seam allowance, waistband, waist placement, and muslin symptom apply? | Problem is classified before correction |
| Recommendation | Which pattern response matches the diagnosis? | Alteration type matches the cause |
| Red flag | Is there cut-edge confusion, crotch-depth confusion, universal benchmark use, unsupported source attribution, numeric-example inheritance, or undiagnosed scooping? | Risk is removed or bounded |
| Exception | Is a different drafting convention, waistband rule, intentional seam difference, or construction-specific corner involved? | Exception is clearly stated |
| Verification | Do measurement, muslin, seam-walking, truing, fly, pocket, waistband, grainline, and balance checks pass? | Pattern is approved only after checks pass |
| Source scope | Are Threads sources used only within evidence limits? | No source is stretched beyond scope |
| URL validation | Are internal links approved and non-invented? | No invented URL or self-link |
What Final Checklist Confirms Front Rise on a Pants Pattern Is Ready to Cut?
A final checklist confirms front rise on a pants pattern is ready to cut when terminology, seamline measurement, fit goal, alteration accuracy, truing, and muslin behavior all pass the same convention.
Complete the six-part audit before cutting fashion fabric. These interactive checks save locally in the browser.
1. Definition Check
2. Seamline Check
3. Fit-Goal Check
4. Alteration Check
5. Truing Check
6. Muslin Check
What Final Rule Should Guide Front Rise on a Pants Pattern?
The final rule for front rise on a pants pattern is to define the measurement convention, measure the stitching line, diagnose the muslin, and true the pattern before making permanent cutting decisions.
Keep seam allowance, crotch/inseam junction, waist seamline, waistband construction, body measurement, pattern measurement, finished garment rise, waist placement, alteration type, dragline evidence, seam walking, truing, and the pre-cut audit inside one consistent measurement system.
No single front-rise length, crotch curve, crotch extension, waistband construction, or alteration method works for every pattern or wearer. Front-rise work must remain diagnostic, source-scoped, construction-aware, and testable.
A correct front rise is not proven by one number; it is proven when the stitch-line measurement, waist placement, crotch geometry, muslin fit, and trued pattern all agree.